Tuesday, October 19, 2010

Felted Flower Pillow & Zipper Tutorial

Hello All!
   Finally back into the groove of the week. It is raining cats & dogs here and it was totally inspiring to get started on some crafts and projects.  I have been really into decorating my house for fall.  I have taken 3 pillows off our couch and have made fun slipcovers for them especially for the season.  The first pillow was a polka dot pattern with a felted owl on it. You can see that project here.  This pillow was a lot more work but it ended up super cute! Because i'm impatient here are the before and after pics now!

Before:

After:
Cute huh?!?

So here's how it's done!

Supplies:
  • 1/2 yard material in color of your choice
  • 1/2 yard felt in color of your choice (you will have plenty of extra but err on the side of precaution so you can mess up if necessary!)
  • SHARP scissors
  • ruffle pattern (i free hand drew one on a large notecard and cut it out)
  • standard sewing supplies (machine, needle, thread, pins)
  • Decorative Button
  • Invisible Zipper )12-14 inches
  • Hot Glue Gun
Directions:

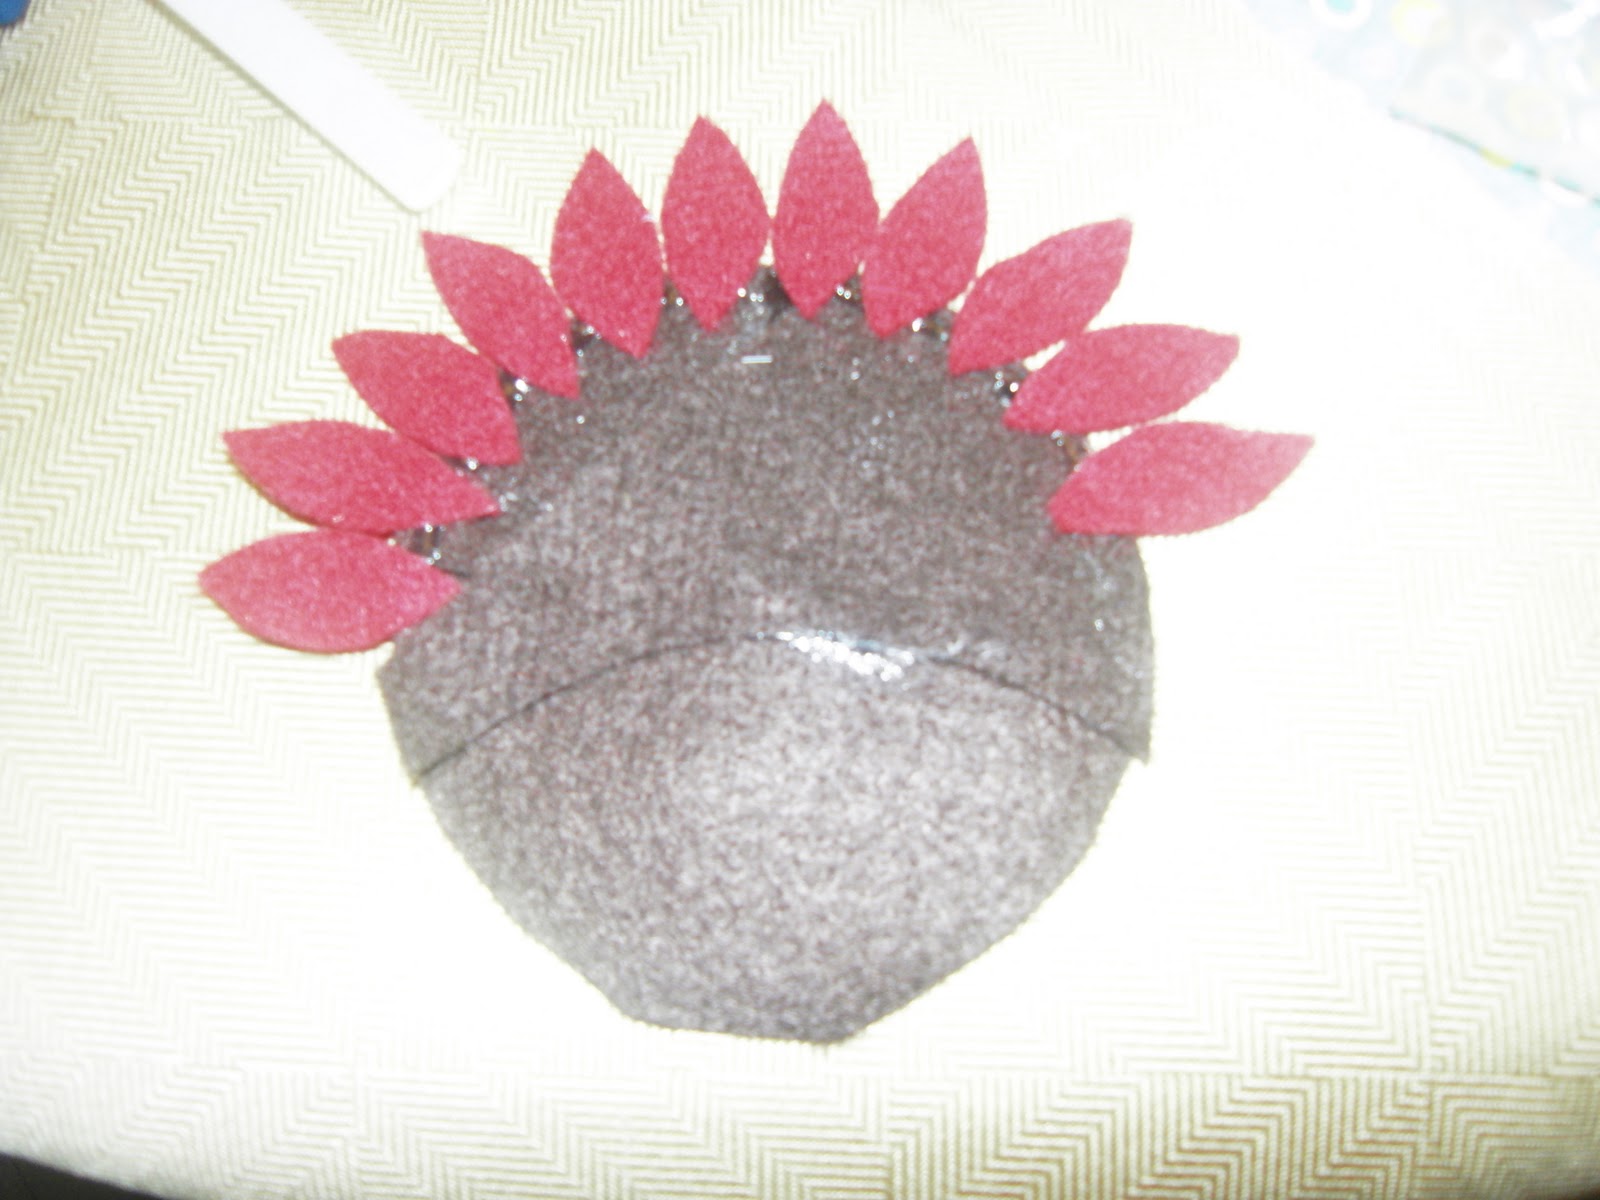
  1. I decided to make the decorative flower first.  I used a circle of old felt I had to glue the petals onto a base.  I drew a small petal pattern on a notecard and cut out a TON of these little suckers. Then carefully glued them onto the felt overlapping to get the flower effect. 


2.   Then I cut out the fabric into 2 identical squares.  I had a 16 by 16 pillow so I made my squares 17x17.  
3.   Then the fun part....Tracing and cutting out all those sweet little ruffles.  It was a long process. But 2 episodes of Glee and 3 of Gilmore Girls over a period of a week & it was done!


I carefully layed them all out in a pattern on one of the pieces of fabric and sewed them on.  I had to piece some together for the longer length.  I chose to do mine at an angle but any direction you choose would be great!

4.  Now for the zipper.  With the right sides together pin your fabric together on the bottom.  Place the zipper on the middle and mark the opening and closing on each side.  Sew from the end to each mark leaving a huge gap in between for the zipper.

5.  Then open up your fabric and iron the seams open as well as the fabric creating a little flap on each side. 


6.  Now you are ready to pin and sew your zipper! Pin your zipper on the tailored side of the fabric as close as possible to make it invisible.  Using the zipper foot on your machine top stitch the zipper into place!

7.  Once that is done OPEN YOUR ZIPPER!!! i cannot stress this step enough! Trust me!! OPEN YOUR ZIPPER. otherwise you will spin some time with a safety pin and a huge light cursing your stupidity (i wouldn't know ANYTHING about that)

8.  From there its simple! Put the right sides of the fabric together, pin carefully so everything matches up and sew it closed!! 

9.  Once it is right side out again I would place it on the pillow so you can get great placement on your decorative flower.  Hand sew the flower into place and Wha-La!! Beautiful Fall Pillow! 

Dont be surprised if you see a lot of pillows soon! i am trying to build up some stock for a boutique coming up in December and am really excited to get creative! Until next time...

Blessings!


The Trendy Treehouse


Make it Yours @ My Backyard Eden

Monday, October 18, 2010

Absent for Awhile & New CHRISTMAS ideas!?!?!

Hello all!
First i must apologize for being absent lately. I have been working tirelessly to clean out my garage to make a mini craft room! We own a town home so I cant make major changes. If I could you better believe I would have whipped out the paint and maybe even some drywall! i don't have any before pictures but please imagine a VERY messy garage with boxes EVERYWHERE!! Here is my enjoyable little space now!
I used some old saw horses and a door that we had removed from our house to make an EXTRA long table. This means I can have my sewing machine on one end and everything else on the other!

an OLD TV that I can play DVD's on to help pass the time away. During the day I open up the garage door and get great sunshine and a breeze to cool off and brighten up the space. 

i know it doesn't look like much but its pretty much awesome to me! With an 11 month old daughter crawling around, the fact that I can start a project and leave it (sharp scissors and all!) is so freeing!!


So on to my Christmas Ideas... I know what you are thinking. Mollie, Christmas ideas?!? really?!? its not even Halloween yet!  I know..but i LOVE LOVE LOVE Christmas and when i get going I can't stop. I love my house decorated for fall but i am practically salivating at making Christmas decorations.  This is a simple gift idea for that special friend to give them something small but meaningful or that last minute party you are invited to, or that awkward moment where someone gives you a gift and you are totally unprepared!!?  I introduce: Peppermint Hot Chocolate in a jar!

Its SUPER simple to make and everyone loves it!

Ingredients:
  • 1-quart Jar
  • 1 1/2 cups powdered nondairy creamer
  • 1/4 tsp salt
  • 1 cp nonfat dry milk powder
  • 6 tablespoons unsweetened cocoa powder
  • 1/4 cp packed brown sugar
  • 16 peppermint sticks, coarsely crushed (i used a plastic bag & a rolling pin...took care of some pent up frustration. hehe)
  • 1 cp milk chocolate chips, divided.
1.  Combine creamer and salt in a small bowl; stir well.  Combine milk powder and cocoa powder in another small bowl; stir well.  Pour 3/4 cp creamer mixture, 1/2 cp cocoa mixture, remaining creamer mixture and remaining cocoa mixture into a 1-quart wide mouth jar with tight-fitting lid.  Pack down firmly after each layer (I used the bottom of one of my spice jars)  Add granulated sugar, brown sugar, half of peppermint, 1/2 cp chocolate chips, remaining peppermint and remaining 1/2 cp chocolate chips.  Pack down firmly after each layer.  Seal jar.  

2.  Cover top with fabric or festive ribbon.  Attach a gift tag with these instructions:

  •     Pour contents of jar into large bowl; mix well. Pour mixture back into jar.
  •    For single serving place 1/4 cp cocoa mix into cup add 3/4 cp boiling water; stir until chocolate has melted and peppermint is dissolved. ( Add more boiling water to taste, if necessary) Garnish with whipped cream if desired.  Makes 16 servings. 

I like to make up a HUGE batch of these and have them ready to go when the time comes.  I normally get the jars from Michaels ($1.99 a pop).  I will be playing around with some other recipes too..cookies, soup, raisin bread. Keep logging on to get more ideas! 


mmm button


Photobucket

Tuesday, October 12, 2010

One of Those Days

Hello All!
  Today was one of those days.  You know the kind where you feel really busy but nothing seems to get done? At the end of the day there are still dishes and things to pick up?!? Where did the time go? Today was that day for me plus my Z is getting a new tooth and was super cuddly today and I'm not going to pass that up!  I did get a couple minutes to finish up the extra hair clips I had.  Here are the rest of them...


All of them will be available on my Etsy store... (look to the right sidebar) Until next time!

Blessings!

Monday, October 11, 2010

Baby Hair Bows

So I love my daughter to have something girly on her head. Its the best! But i was tired of trying to track down the PERFECT bow for her outfit (she's only 11 months i know, but its important ok?!?)
sorry its blurry. she's quick!


Here is a quick tutorial on how to make these sweet little bows.

Supples:
Ribbon (thin...)
Alligator Clips
Embellishment of your choice
Hot glue gun
Scissors
Adorable Baby Model (optional...but way more fun!)

Steps:


1.  Warm up your glue gun and put a small dot on the bottom inside part of the clip on the base and the tip.


2.  Wrap Ribbon around the back of the clip gluing as you go. 
3.  Wrap Ribbon around the base of the clip and continue gluing around the "hinge" part. Its pretty simple. Just keep wrapping and gluing until completely covered. 


4.  Embellish as you see fit! 


As always...these bows and many others will be available on my etsy store. Look in my sidebar for a direct link!  

Until next time...

Blessings!


Target Frame Makeover

So I think my favorite word is Clearance! Something about that magical word gives me goosebumps and makes me anxious. I was at my favorite place in the world a couple days ago...Target and found these simple white frames on clearance! Originally $9.99 and on sale for $2.48!


Since I am hoping and dreaming of redoing my kitchen I decided on doing a cute little frame in my accent color (Robin's Egg Blue).  To see all the supplies needed click on this link 

    1. First...I removed the backing and glass. Then  I sanded everything down to get a smooth surface. Then wiped it clean with a dry paper towel.

2.  Next I applied 2 coats of spray paint allowing it to dry in between each coat. Have I mentioned before I hate waiting?!?

(You can see in the picture that its not perfect but I kind of like it that way)

3.  Next I took my stencil from my previous project and angeled it on the corner of the frame.  Using my stencil adhesive I sealed it down and painted with my acrylic paint. 


Then I used my sand paper again and distressed the edges a bit. I like that rustic look. I added a sweet black and white pic of my little family from when my daughter was first born and wha-la!  My plan is to get a picture of my Z with a super messy food face, make it black and white and add it to the frame. Shouldn't be hard to get the pic since that happens hourly at our house... its a matter of getting the photo printed! 
 I still have not gone to the store to buy a seal for both my Kitchen Mat and my frame yet but I will soon! Now for the before/after photos:

Before:
After:

Before:
After:

Hope you enjoy!

Blessings!


Keeping It Simple
Linked on Polly Want A Crafter? 

Sumo Sweet Stuff